Turning OCR output into great PDFs
Recently we have been putting some effort into improving the PDF output from our tools, which have all made it into the latest release of rescribe (v0.5.1). While they may seem simple, PDFs are a surprisingly complex, sometimes tricky file format to produce correctly, so here we’ll run through some of the ways we get really good PDFs out of our pipeline, and exactly what “good” means in this context.
What makes a good searchable PDF?
A good searchable PDF is fundamentally a PDF which is clear and easy to use, and where everything works as expected. More helpful in understanding how to get there is to consider some of the many ways that a searchable PDF can fail to live up to that goal.
- Copy-pasting text from a PDF has no space between words, extra line breaks, or other formatting issues.
- Non-ASCII characters aren’t correctly embedded, so searching for words which contain them, or copying them from a PDF, doesn’t work.
- PDF doesn’t open in some PDF readers or causes warnings to be displayed.
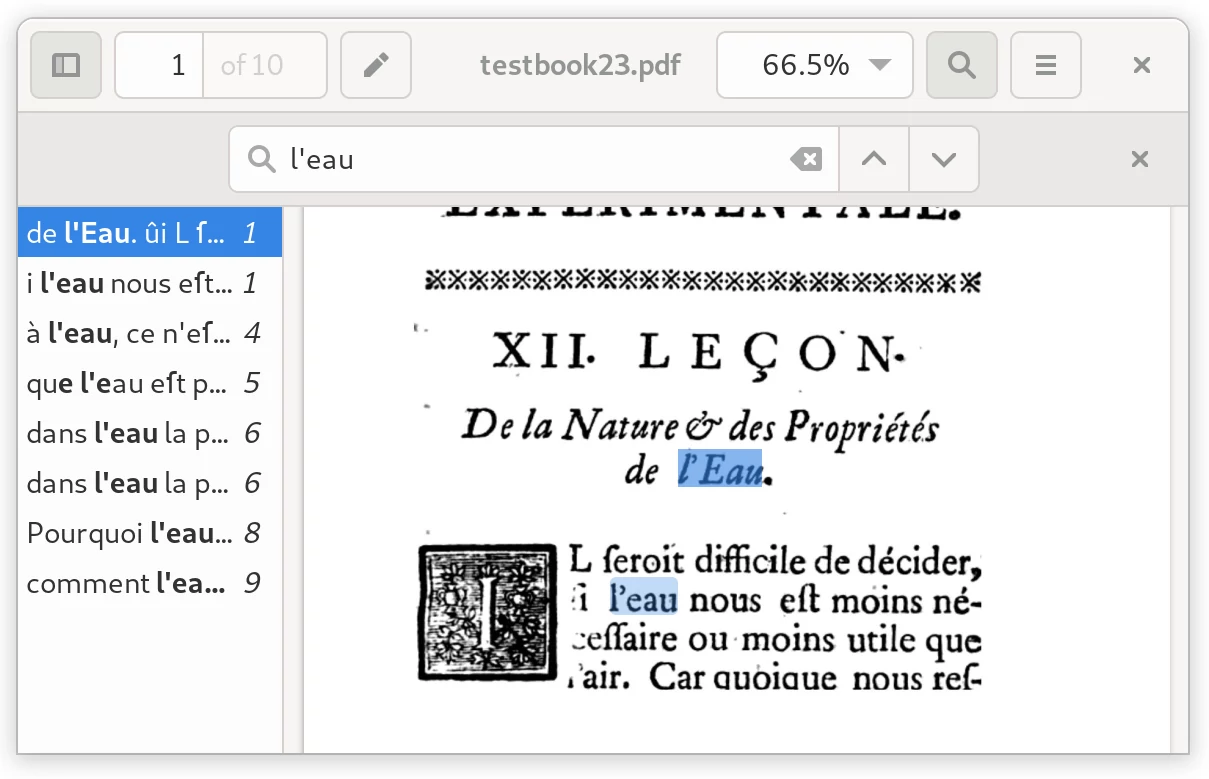
- When searching a PDF, the highlighted area for a match doesn’t exactly match the location of the result.
- PDF files are very large, meaning they’re difficult to share, slow to work with, and can cause issues on older computers.
- Page images are so compressed that the text is difficult or impossible to read.
- The DPI is set incorrectly, which can cause PDFs to be rendered far too large or small by default, both on screen and if printed.
This list should give a sense of how the simple goal of producing a searchable PDF that just works as expected actually requires a good deal of care and thought to get right. In the rest of this post we’ll go over some of the more interesting and tricky issues we tackled to get the PDF output of our tools to the excellent state it is in today.
Finding a good image size to embed
We prefer to do our OCR on images scanned with high DPI, as they produce more accurate results, but they also take a lot of disk space. As an example, the page images we use derived from books from Google Books tend to be around 1600x2500 pixels, which even when compressed as JPEG results in each image being around 500KB. While that may sound manageable, a book with 500 page images of this size would therefore take around 250MB, which is an annoyingly heavy PDF to open, store, and share.
To produce a readable, searchable PDF, we found that using a fixed image height of around 1000 pixels was about right. This results in a PDF which is high quality, but is rather more manageable, clocking in at around 70MB for a 500 page book.
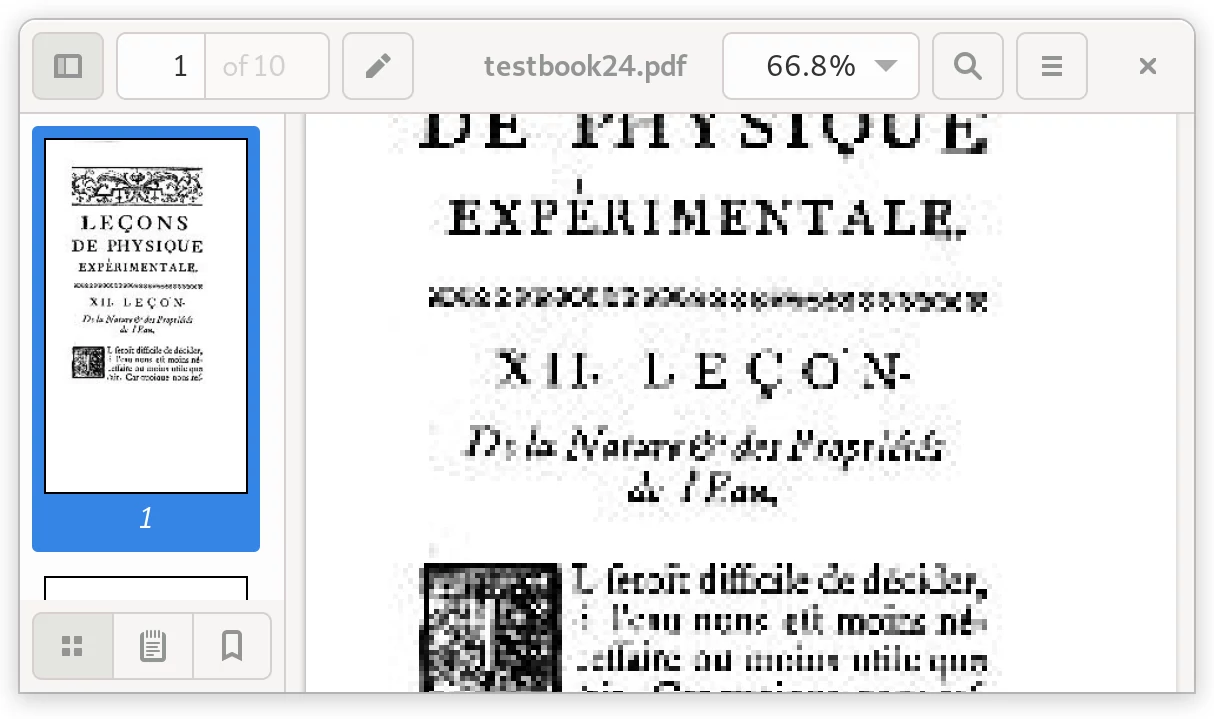
Example of a PDF with overly compressed images.
Hiding the text layer
Interestingly there are quite a few different methods for creating the text layer on a searchable PDF made up of page images. One common method is to use a font which is completely invisible, however this is somewhat of a hack, and can cause issues with Unicode characters, and generally be unreliable.
The best method, which we have implemented, is to use a feature of the PDF specification called “Text Rendering Mode” to request that the text should be laid out as normal, but not actually drawn in the final output. Not many PDF rendering libraries seem to support this, but we were able to easily add it to the gofpdf package we use, and get the support integrated upstream into the official library for others to benefit from. We could then use a simple and reliable freely licensed Unicode font, DejaVu Condensed, so that any complex characters and layout is handled correctly, while the only text visible in the PDF is that in the original page images.
Aligning the text with the image
The trickiest part of getting a really good searchable PDF is lining up the text layer perfectly with the printed text in the image. The font chosen for the PDF text layer will rarely have precisely the same dimensions as the text in the image, so it’s common to have text which doesn’t line up precisely with its location on the image. There are several ways to address this, but doing it right isn’t easy.
One way would be to specify the exact location of each character, using the coordinates directly from the OCR engine. This has some appeal, as the starting location of each character should be exactly correct. However, it leaves the PDF viewer to decide where spaces between words should be, and which line each character is on. While that may sound straightforward, in a large corpus, even of good quality scans, this causes constant errors. This results in blocks of text copied from the PDF being garbled, and means searching by word or phrase will generally fail, as spaces are incorrectly added or omitted by the PDF viewer.
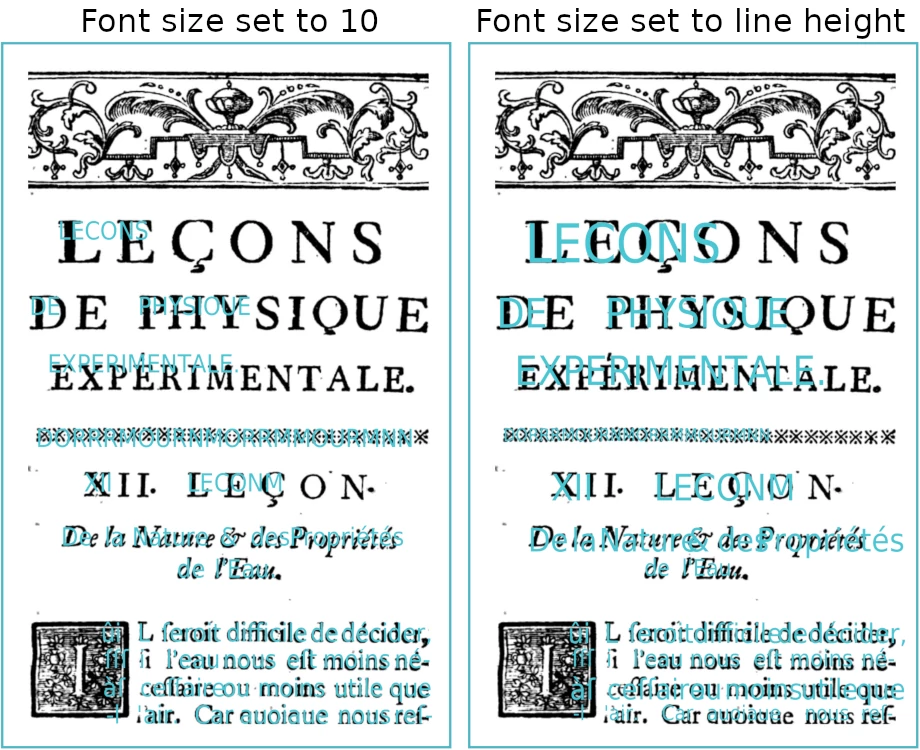
Example of setting font size using lineheight (hidden text layer in blue).
Specifying the location of each word, instead, addresses the issue of spaces being incorrectly added or omitted, but there are still several issues remaining. As each word can have its highest and lowest points at different levels, depending on whether there are characters with ascenders and descenders present (such as ‘b’ and ‘p’), then each word is seen to move up and down relative to its neighbours, which affects the ability of the PDF viewer to determine whether they are on the same line more than you would expect, resulting once again in unreliable search and text copying. The solution to this is simple, to always set the vertical position and height of each word to that of the line as a whole, ignoring the dimensions given by the OCR engine.
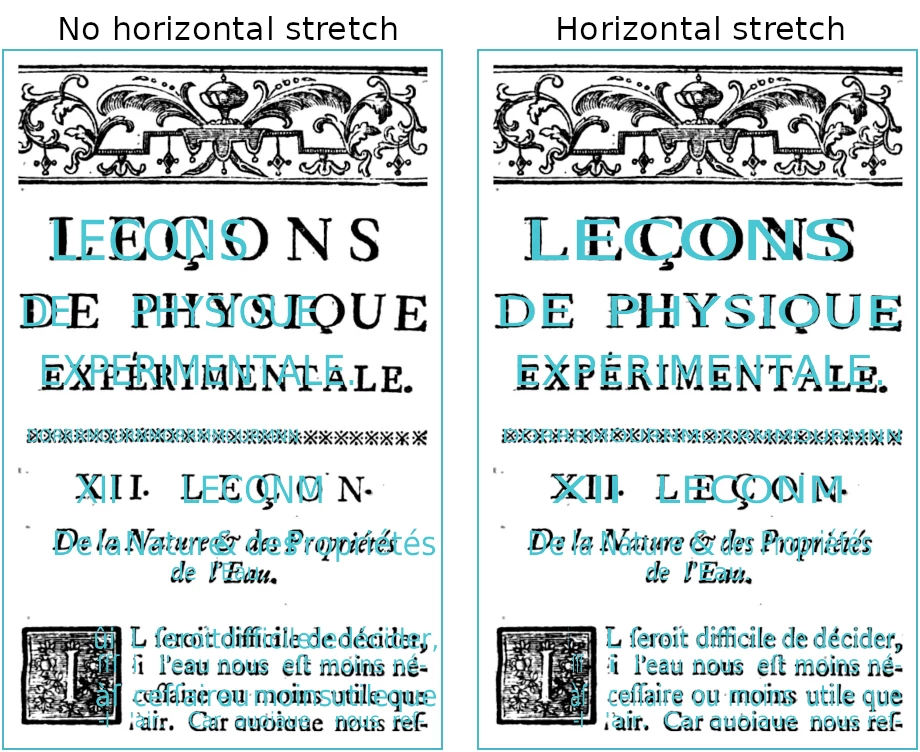
Example of the effect of adding horizontal stretch (hidden text layer in blue).
That improves things a lot, but there’s still one issue, which is that each word may be too narrow or wide to match with the text in the underlying image, as the font dimensions will not precisely match those in the image. This isn’t the end of the world, as it doesn’t affect searching or copying of text, but it is unexpected and messy, and we can fix it. There are two parts to the fix. The easy one is to set the font size for each word to match the line height, which gets us most of the way there. To perfect things, though, is more tricky. The goal is to stretch the characters in each word to ensure that they precisely fill the width dimensions that the OCR engine reports. This can be done using a feature of PDF called “Horizontal Stretch”, which again we had to add to the gofpdf library to implement. With this last step done, the text lines up pretty perfectly with the text in the underlying image, while perfectly supporting search and copying of any amount of text.
Conclusion
PDFs may seem straightforward, but producing really high quality searchable PDFs from OCR took us some work to get right.
You can see the results with the latest versions of
the rescribe tool
or the pdfbook tool in the
bookpipeline package.
Let us know how you get on by email or
@RescribeOCR on twitter.